 |
|
 Sep 05, 2006, 02:30 AM // 02:30
|
#1 |
|
Frost Gate Guardian
Join Date: Jul 2006
Profession: E/
|
Profession: Elementalist/Mesmer
Type: Solo farming, Underworld (Smite Run) Category: Geomancer Attributes: Earth Magic - 15 (11 + 3 + 1) Domination Magic - 11 Energy Storage - 9 (8 + 1) Inspiration Magic - 3 Skills: Aura of Restoration - Energy Storage Sliver Armor - Earth Magic Empathy - Domination Magic Spirit of Failure - Inspiration Magic Glyph of Renewal {E} - No Attribute Magnetic Aura - Earth Magic Armor of Earth - Earth Magic Kinetic Armor - Earth Magic Equipment: Any 60 AL armor (Tempest is ideal); a customized Galigord's Stone Staff or similar; a weapon/shield set with +20% enchantment duration and -2 damage (while enchanted) bonuses; optionally, a longbow for pulling Summary: This build relies on the Earth Magic armor enchantments coupled with a constant Magnetic Aura (achieved via Glyph of Renewal) to tank the damage put down by the denizens of the Underworld. Aura of Restoration is used to heal, Spirit of Failure provides energy, and Empathy and Sliver Armor do the damage. Specific creature strategies and a walkthrough follow. Dying Nightmares: One on one: It will take two good staff shots, or three poor ones, to kill a Nightmare. Even if it manages to rend whatever enchantments you might have up, it can't do enough damage to be threatening. So, simply attack it. Rarely, you will aggro a Dying Nightmare on the other side of one of the closed doors. It will rend your enchantments, and there's nothing you can do about that, but if you hex it with Empathy, it will usually induce the Nightmare to attack (even though there is solid rock shielding you). This should kill it directly. With other creatures: Unfortunately, your only real option is the same as in the above case; i.e., attack it with your staff. It probably goes without saying, but a Dying Nightmare is always your primary target. If you attack the Nightmare before it starts casting Rend Enchantments, you can get off two attacks before it completes the spell. Ideally, this will kill it and you can go back to business as usual. If you cannot get to the Nightmare in time or if you fire two weak shots, then you have a big problem. I'll leave the specifics to the section on Bladed Aatxes though. Incidentally, if you come across the dreaded dual-Nightmare spawn with other creatures aggro'ed, you're as good as dead. Clearly, one would desire a better approach to this scenario, but in the context of the entire run, it's difficult to pick a skill to give up in favor of something like Obsidian Flesh or Power Spike. Bladed Aatxes: There are two ways to approach a group of Aatxes: one when you are sure that there are no Dying Nightmares between you and the Aatxes and one whenever there is a doubt. Unless you've previously aggro'ed a given group and know for sure one way or the other, it's a judgment call as to which to use. Although, realistically, you're only trading a little speed for a little security. No Dying Nightmares: Cast Kinetic Armor, then, as it begins to blink, Aura of Restoration. This preserves as much energy as possible for the coming battle. Cast Armor of Earth in the same way. You should be moving to aggro the Aatxes at this point. Right before you reach them, activate Glyph of Renewal. Then, pull the nearest Aatxe by attacking with your longbow (for maximum safety) or staff. As the Aatxes move in to attack you, you should be backing away so that any patrollers and Dying Nightmares won't be alerted. Be careful not to trap an Aatxe, especially in the cracks in the staircases, as you want to have all of them attacking you. Throughout this process, you want to keep an eye on Kinetic Armor; if it starts blinking, cast Magnetic Aura immediately. In any event, you should cast it before the Aatxes close to within melee range and switch back to your staff, if necessary. Next, cast Sliver Armor. The Aatxes will try to disrupt this with Savage Slash, but usually won't get it. Retarget onto the Aatxe getting damaged by Sliver Armor, if necessary, and cast Empathy on it. By this time, all the Savage Slashes should have been exhausted and you can safely get off a Spirit of Failure, which is the most important spell at this point. Next, start attacking the Aatxe. Staff attacks are actually a significant source of damage for this build; around 10% of your total damage against Aatxes will come from them. Best of all, they are completely free. Incidentally, this is why you don't want to be using something like a Totem Axe or a Fiery Flame Spitter (yet), because they will invoke the Aatxe's Riposte. If everything has gone according to plan, Sliver Armor will be finishing shortly, and you will need to renew Magnetic Aura soon. Always precede Magnetic Aura with a Glyph of Renewal; this is the trick that allows you to keep Magnetic Aura up indefinitely. It's imperative to have Magnetic Aura up 100% of the time for several reasons. First, it will block at least some of the Savage Slashes so that you can cast in relative security. Second, it will make it difficult for the Aatxes to generate the adrenaline they need to power their Sever Artery and Gash skills (and block 75% of the ones they do get off). This is vitally important. If you end up dying against the Aatxes, it will probably be because you are bled and deep wounded to death, since your armor enchantments will negate about 90% of the damage that the Aatxes would otherwise do. Incidentally, you can use Glyph of Renewal to estimate the time you have left on your Magnetic Aura. When Glyph of Renewal has recharged fully, you have about eight seconds of Magnetic Aura left. This is important so that you aren't halfway through casting Spirit of Failure when Magnetic Aura fails. Dealing with the Aatxe's Savage Slash means basically doing three things. First, keep Magnetic Aura up 100% of the time as noted above. Fortunately, the creature AI doesn't see Glyph of Renewal as a threat and never tries to disrupt it. Furthermore, since Magnetic Aura casts in 1/4 of a second while Savage Slash takes 1/2 of a second, it's pretty much safe. Second, you want to shield your important spells, as much as possible, with either Empathy or Spirit of Failure. With two and three second activations, respectively, these almost always draw a Savage Slash, and, since they both recharge in ten seconds you won't really be losing much even if the blow does land. Either way, Savage Slash takes 20 seconds to recharge, so you've bought yourself enough time to cast every single spell you have safely. Third, realize that a limited number of spell interruptions won't affect the overall game plan. You can afford to lose perhaps three or four Sliver Armors, Empathies, and Spirit of Failures before this develops into a problem, and that only because Savage Slashes do extra damage. Armor of Earth is a bit more vital, but since it recharges in 15 seconds, you can often wait it out. The real concern is that you will lose Kinetic Armor because you were interrupted. You can avoid this potentiality by not waiting for the last moment to cast a spell to save Kinetic Armor. That way, even if you do get interrupted, you can hit a quick Aura of Restoration and everything will be OK. So, after casting Magnetic Aura, the next spell coming due will be Armor of Earth, and then Empathy. You will also have a window to put down an extra Spirit of Failure on the other Aatxe here. If you can maintain two Spirit of Failures, the energy will roll in as fast as you can use it up. So, if your health is low or you are bleeding due to Sever Artery, cast away and heal yourself via Aura of Restoration. Incidentally, you can tell when Empathy is in force by looking for yellow -25 damage indicators floating off an attacking Aatxe. Similarly, Spirit of Failure will generate purple +2 energy indicators over you when a hexed Aatxe misses. From here out, you can't really play according to a script. Obviously, you need to keep Magnetic Aura and your armor enchantments up. Also, it's nice to have Empathy on your target Aatxe 100% of the time and Sliver Armor whenever possible. You can live at least temporarily without Aura of Restoration and Spirit of Failure, but should try to get these back up in a timely fashion. Basically, as long as you can control the flow of the battle, you will eventually wear down the Aatxes. Being that we're relying on a random element for our protection (there's no telling which 25% of attacks will pass through Magnetic Aura), there's no guarantee that your going to win every fight. So, the real question you have to answer is when to stay with the battle and when to invoke discretion and flee. Sometimes, the Aatxes will not break and the choice is made for you, but most of the time you have that option. You can hold out at around 100 hp, assuming that you are not bleeding. If you are bleeding, I would say that 200 hp is about the safe minimum, as you have to worry about the impending Gash. You should also take your energy reserves into consideration. If you are at 15 energy or less, then you won't be able to cast spells for the purpose of healing via Aura of Restoration. Lastly, you want to weigh how much health the Aatxe has; considering its natural healing, anything more than 10% of its maximum hit points is a lot. All in all, you'll rarely regret bagging it at the first sign of danger, especially considering your mistakes will cost you 1k each. If everything does go right, then you will take out one Aatxe in about a minute, a little less if you get a rapid recharge of Sliver Armor. Since everything never goes right, it's more like 80 seconds typically. Note that you are taking out one Aatxe at a time; so, this build is slower on Aatxes than conventional 55 hp Shield of Judgment/Zealot's Fire builds and much slower than 55 hp Necromancers packing Spiteful Spirit. For the most part, you can only take on two Aatxes at a time. Three is not instant death, but the minor improvement to your run time (Sliver Armor works better with more attackers) isn't really worth the added risk. Also, note that if you follow the walkthrough suggested below, you shouldn't have to fight more than two Aatxes at once. Video 1 Video 2 Since the Aatxes are likely to be the stiffest challenge you will face, I put up two videos for them. The first video illustrates a battle where nearly everything goes according to plan, and the second shows a battle where I nearly died. Neither is necessarily representative, but at least you can see the extremes. Dying Nightmares possible: Ideally, you have Kinetic Armor up; in which case you will want to maintain it throughout the following workup (use Aura of Restoration if need be). In either case, it should be recharged and ready to cast. If not, wait for it. The idea here is to give yourself some protection from the Aatxe as you take out the Dying Nightmare while still leaving some quick protection available if it gets its Rend Enchantments off. The first thing to do is cast Armor of Earth. Then, wait for it to nearly recharge and cast Glyph of Renewal/Magnetic Aura. Move towards the Aatxe(s). If the Nightmare is visible, then simply target it, attack, and hope. If it is buried (or likely to be), then advance up to just outside aggro range of the Aatxe. If the Aatxe starts to move towards you for no obvious reason, that's a dead giveaway that a Nightmare is coming directly. When a Dying Nightmare pops up, immediately target it and attack. If the Aatxe never moves and no Nightmares appear, then just engage the Aatxe as outlined above. Assuming that you encounter a Nightmare, one of two things will happen: either you'll kill it before it gets its Rend Enchantments off (in which case all is well and you can now concentrate on the Aatxe) or you don't. If you do lose all your enchantments to the Rend, then immediately hit Magnetic Aura (you should be poised to do this quickly in anticipation of it being necessary) and follow that with Armor of Earth. Then, you will need to bait out the Savage Slash from the Aatxe using Sliver Armor or Empathy. After it comes out, you can cast Kinetic Armor safely. Now is a good time to finish off the Dying Nightmare. Assuming you are still alive, you may as well just run away because you're living on borrowed time. Specifically, there won't be a replacement for the current Magnetic Aura when it expires. Most Aatxes will drop off after about ten to fifteen seconds of running, although some never will. As a last resort, you can head to the platform where you began and run around the ghosts there until Magnetic Aura recharges. You should be able to avoid about half the attacks this way. If you are really desperate, e.g., bleeding with little health, and need to lose the Aatxe right now, you can try to get it stuck behind Benton. It's cheap, but this is no occasion to be proud. To do this walk behind Benton, passing him on his right-hand, or eastern, side. With some effort, you can slide behind him towards the dais; you will have to side-strafe and follow the line of the ledge as closely as possible. The Aatxe will be too big to follow. Note that this is an all-or-nothing proposition; if you can't get behind Benton, the Aatxe certainly isn't going to move out of the way to let you through. You can also try something similar with Anson. Just move from his right to his left as you approach him and stay closeby as you pass him. Beware though, if the Aatxe doesn't fall for it, you're absolutely trapped. Also, once in a blue moon, you can get it caught by circling around Sarah. Video - This demonstrates how to kill a Dying Nightmare while under pressure from an Aatxe. Grasping Darknesses: The keys to taking out the Grasping Darknesses are to get Spirit of Failure on one or more of them and to negotiate their Distracting Blow. As before, Magnetic Aura screens you to some extent, but also the Darknesses are quite predictable. They will generally use Distracting Blow once as soon as they get to you, so you shouldn't be casting anything as they are arriving. To take out the Grasping Darknesses then, start by casting Kinetic Armor, Aura of Restoration, and Armor of Earth as with the Aatxes. However, you also want to cast Glyph of Renewal/Magnetic Aura before battle as well. Invoke Spirit of Failure on the nearest Darkness to aggro a group. Spirit of Failure in concert with Magnetic Aura largely negates their "Fear Me!" skill. However, note that you really only want to take on one group at a time, otherwise their interruption and energy denial become a bit much. As they are approaching start attacking them, both for the damage and as an extra target for their Distracting Blow (it's pretty easy to bait it out of them). The Distracting Blow attack has a distinctive look and is easy to spot. Just look for an attack during which the striking tentacle glows. After the initial volley of Distracting Blows (make sure all the Darknesses use it once), you have ten seconds during which you can cast unharassed. So, cast Sliver Armor. Then, retarget on one of the Darknesses that isn't being damaged and cast Empathy on it. Then, continue as with the Aatxes. The Darknesses aren't that difficult to kill. Sliver Armor chews them up, especially when they are under Flurry. One on one, you can just use Empathy and your staff. The trouble is that once the battle starts going downhill, it's hard to recover. Also, you can't run from them unless you have a lot of room. Lastly, it is important to keep Magnetic Aura up to keep them from building adrenaline. This will keep them from using "Fear Me!" every five seconds and make Skull Crack, at a cost of nine adrenaline, a distant possibility. Video Smite Crawlers: The Smite Crawlers are an interesting case. With your armor enchantments up, they can't really hurt you (you could probably tank twenty comfortably, although I've never been able to aggro that many). At the same time, you will often have difficulty hurting them. In any event, they are our preferred enemy because of the quality of drops that they offer (including ectoplasms) and their lack of interruption skills. Fighting the Smite Crawlers requires different tactics than the Bladed Aatxes and Grasping Darknesses. There are two things you don't generally want to do to them: cast Empathy and attack. Casting Empathy will allow them to use their Smite Hex skill, which will slap you with 85 armor-ignoring damage. Attacking will activate their Shield of Judgment, which knocks you down and hits you for 50 damage, similarly armor-ignoring. You can't withstand this type of damage for long. Instead, you must rely mainly on Sliver Armor. So, as you are nearing the Crawlers, cast Kinetic Armor, Aura of Restoration, and Armor of Earth as before. However, you don't need to cast Magnetic Aura, as their melee power is negligible. Instead, save it for when you are running low on health or energy (and you need to maintain Kinetic Armor). You will want to switch to your weapon/shield set at this point as well. Then, aggro the Crawlers. Now, you will use Glyph of Renewal in concert with Sliver Armor; this allows you to keep up Sliver Armor approximately 90% of the time. All you really need to do is alternate this combination with Aura of Restoration and Armor of Earth to keep up Kinetic Armor. Ideally, you're going to get a group of five Smite Crawlers. The first one will die in about ten seconds, the second one will take another twelve or so, and the third perhaps twenty. However, the last two are tricky (which is why you want to aggro as many as possible to begin with). You see, as the Crawlers start dying off, Sliver Armor becomes less of a threat, and they can stay ahead of its damage with their Reversal of Fortune. Of course, if they are casting Reversal of Fortune, they aren't attacking, which makes things worse. You can eventually wear down the fourth Smite Crawler, but it will take another two minutes or so. The last one won't die without some other form of damage to help things along. So, you've got three options (listed here in order of preference): 1) The problem is that you don't have enough creatures attacking you, right? Well, the Underworld is full of them. Just drag the last two Smite Crawlers along with you as you make your way to another group of them. Be careful to avoid the Coldfire Nights (or don't, they will work as well as another group of Smite Crawlers, they just tend to kill you faster). The only real danger here is coming across a buried Dying Nightmare. For this reason, I would change back to the staff while running. If you do get your enchantments rended, hit Magnetic Aura, then Armor of Earth, then Kinetic Armor. Two Smite Crawlers and a Dying Nightmare aren't enough of a threat to kill you in this period of time, generally. Unfortunately, you can't keep dragging around Smite Crawlers indefinitely. Sooner or later, you will need to regenerate your energy and health. You can try to run off them, but they will follow for quite awhile. You will tend to regenerate health while running, as their attacks and especially the damage from Zealot's Fire won't tend to land as frequently. Also, if you only cast spells as needed to maintain Kinetic Armor, you will slowly regenerate energy as well. So, there is some hope along these lines. 2) If you have a lot of health, you can try attacking it with your staff. This will be sufficient, damage-wise, when coupled with Sliver Armor, but you're running the risk of killing yourself via Shield of Judgment. It is possible to work around Shield of Judgment (it only lasts about 20 seconds and recharges in 45, giving you a 25 second window of opportunity), but it's tricky. The problem is that you can't tell if it is active using the "yellow arrow method" because the Smite Crawlers run so many enchantments. The one more-or-less surefire way of avoiding Shield of Judgment is to wait until you see it being cast, then count off twenty seconds and attack. You should be safe until the Crawler casts it again. If after twenty seconds, you find that Shield of Judgment is still active, it's because the other Smite Crawler cast it, which means you can safely attack that one. This approach is a bit dodgy with two Smite Crawlers, but works fairly well with just one. So, you might want to just wear down the second to last one using Sliver Armor to be safe. 3) If you have a lot of health and a lot of energy as well, you can attempt to kill off a single Smite Crawler with Empathy. You do this by casting Spirit of Failure on it. In a couple of seconds, it will use Smite Hex to remove it. This will hurt you, and it's next to impossible to avoid, even though you know it's coming, since Smite Hex affects all enemies in the area (the largest spell area of effect). As soon as this happens, cast Empathy on the Crawler. Since Smite Hex is still recharging, it will have time to work (this is why you have to have only one Crawler left, otherwise the other one would use its Smite Hex and you'd get nowhere). Renew Sliver Armor if needed. You'll get about twelve seconds of use out of Empathy before it, in turn, gets smited. But it will have recharged by then, so you can just recast it. It will take two or three applications of Empathy, working along with Sliver Armor, to bring down a Smite Crawler. That means you're going to have to weather about 250 points of damage from Smite Hex, along with whatever the Smite Crawler would have done normally. On the positive side, it will be killed within about 30 seconds. My advice would be to mix and match these approaches throughout the run as the situation demands. Video - This video shows a medium-sized battle finished off with staff attacks. Coldfire Nights: Generally, you should avoid the Coldfire Nights, as they drop nothing of great value and can be tricky to kill. If you do decide to engage a group of Coldfire Nights, make sure that you only aggro one group and try to make it a group of two. The main problem with Coldfire Nights is their Maelstrom skill, specifically its interruption property. Combined with Shard Storm or Frozen Burst, it can be difficult to get out of its area of effect quickly enough to cast a spell and maintain Kinetic Armor. The trick is to anticipate when the Coldfires are about to cast Maelstrom. Several things will help with this. First, they tend to cast Maelstrom as the second spell in battle, right after Shard Storm. Second, they tend to cast Maelstrom one after another and in static patterns. So, if you remember the order the first time around, you'll know what's coming the next time. Last, when in doubt, look for a crystal of ice forming under a Coldfire Night; this indicates that you've got about a second before a Maelstrom hits. So, now that you know that a Maelstrom is coming, what to do about it? The most important thing is to maintain Kinetic Armor, the damage you take will be minimal. Generally, I will cast Aura of Restoration or Armor of Earth right before a Maelstom hits. Then, start moving, and once it strikes, walk out of its area of effect. These are tense moments, but you have plenty of time, even at -66% movement speed, to clear two Maelstroms safely. When you are clear and have a break, cast Aura of Restoration to maintain Kinetic Armor. When all Maelstroms have been cast, you will have about 20 seconds to freely cast spells. Generally, I cast Spirit of Failure first, as this figures to be a long battle. However, Empathy and Sliver Armor are what will kill the Coldfires in the long run. You will want to use the Glyph of Renewal/Sliver Armor technique, as with the Smite Crawlers. Also, you will need to approach the Coldfires to make Sliver Armor work correctly (i.e., you must be "nearby" for the damage to apply). This will cue them to use Frozen Burst and Ward Against Harm, which is actually a good thing, since it leaves them less energy to cast Maelstrom and you will see significantly fewer of these. Finally, don't forget to attack with your staff. Sooner or later, the fight will come down to who can avoid the knockout blow while managing their energy adequately. So, respect the Maelstroms, try to get Spirit of Failure working for you early, and meter your spells carefully. Video - This is actually a battle that begins with Smite Crawlers and ends with Coldfire Nights. Generally, this is the only context where you want to purposely aggro the Coldfire Nights. Walkthrough: Video - Here's a video of one complete run. It shows just about everything you need to know to be successful with this run. Be warned, however, this is a 729 MB file. You start the run from the Temple of Ages. Your region must have the Favor of the Gods to gain access to the Underworld. Typically, the favor works its way around the globe as players log on after work or school and log off when they go to bed. So, shoot for the nighttime hours. Speak to the Voice of Grenth and pay the 1k to get into the Underworld. If it is not visible, use the /kneel emote in front of the statue of Grenth. Once in the Underworld, you will see five groups of Aatxes in the immediate neighborhood. Three will be stationary groups of two (groups A, B, and C), and two will be single Aatxes patrolling (groups b and c) -- apologies for the crude diagrams, Paint was all I had to work with. 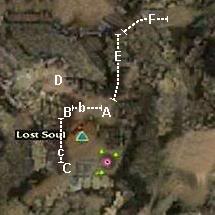 Fig. 1 – Bladed Aatxe spawns, Initial chamber Dotted lines indicate patrol routes that aren't always used. In this case, you may find that one or both of the Aatxe patrollers is stuck in another group. This indicates that there is a Dying Nightmare buried in its patrol route. Since your sole defense against Dying Nightmares is your staff, it is imperative to take them on in isolation wherever possible. So, this walkthrough is designed to segregate the Dying Nightmares as much as possible. 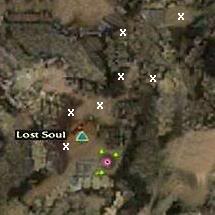 Fig. 2 – Potential Dying Nightmare spawns, Initial Chamber There are usally three or four Dying Nightmares in this initial chamber. Although they can spawn just about anywhere, you can expect them to spawn commonly at the points indicated by X's on the map above (not all X’s will spawn every time). In general, Dying Nightmares don't group with stationary Aatxes and these can be safely pulled. There's about a 50/50 chance that patrolling Aatxes will be grouped with hidden Nightmares. To begin with, head up the stairs toward group A. You want to draw out any Dying Nightmares that might interfere with the coming battle with the Aatxes. Rarely, you will encounter one on the way up the stairs. This is excellent; just stop and attack it until it dies. 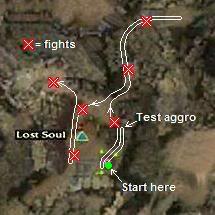 Fig. 3 – Path through initial chamber Usually you won't find one there, however. So, continue on until you are just about to aggro group A. Basically, you are going to do a test aggro to ensure that no Dying Nightmares are in the area. Make sure that patroller b is still well off; you don't want him anywhere close to your aggro circle when you try this. The reason for this is that the patroller won't break off when you run away, whereas the Aatxes in group A will. So, move in close enough to aggro group A and then immediately run back down the stairs. Keep running towards Renault; by the time you get to him, the Aatxes should have broken off. While running, you should scan the radar to check for a Dying Nightmare popping up. This happens about 25% of the time. This will result in one of three situations: 1) The Dying Nightmare will not follow at all and fall into a group with the patrolling Aatxe. This happens frequently. 2) The Dying Nightmare will follow along with group A. This happens rarely but is the most favorable possiblity. The key is that the Dying Nightmare will follow you after group A has fallen off, leaving you one on one with it. You know what to do. 3) The Dying Nightmare will follow along with group A and the patrolling Aatxe. This happens extremely rarely (for me, not once in the last twenty runs), but is a dangerous situation. The problem is the patrolling Aatxe won't break aggro in the space that you have to run. My advice is to run far enough to lose group A, then stop and cast Glyph of Renewal/Magnetic Aura. Then, try to staff-attack the Dying Nightmare before it gets Rend Enchantments off. If you succeed, you can put up your armor enchantments and take out the lone Aatxe as outlined above. If not, recast Magnetic Aura and Armor of Earth, then kill the Nightmare and dodge around the ghosts as outlined above. If this happens to you alot, you're moving too far in to aggro group A, not being mindful of the patroller, or are getting rotten spawns. In any event, around 75% of the time you won't find any Dying Nightmares yet. So, fight group A as outlined above. When they are dead, locate patroller b. If it is stuck in group B, then bypass it for now. If it is indeed patrolling, then move into position to fight it. I usually station myself at the top of the stairs and let it come to me (moving into patrollers generally incurs the risk of aggro'ing a Dying Nightmare and should be avoided). If a Dying Nightmare is patrolling along with it (situation 1 from the last paragraph), then target it and attack it as it comes into range. Don't wait for it to get too close or else you run the risk of launching a stray shot as it pivots about the near patrol waypoint. Once the group b is dead or has been bypassed, your next target is the lone Aatxe on the long set of stairs (group E). Sometimes it will be stationary, sometimes it will be patrolling. Before engaging it, sweep the nearby area for Dying Nightmares. Then, kill it and head up the stairs where another Aatxe waits (group F). Again, this one may or may not be patrolling, and there may be nearby Nightmares. So, sweep as before, then carefully aggro and kill the Aatxe. Finally, sweep the area for Dying Nightmares all the way to the overlook. If you can get this far, you've finished the hardest part of the run. Whatever Dying Nightmares are left can usually be picked off; just don't run headlong into a battle. Furthermore, you have enough room now to run away at your discretion, just come back to this point. So, head back down the stairs and kill group B, patroller c, and group C, in that order. Remember that you will always encounter a Dying Nightmare whenever a group of three Aatxes forms (actually a patroller and a stationary group). Group D is strictly optional, but since you're here to kill things anyway, you may as well take them out. Once all Bladed Aatxes are dead, speak to the Lost Soul which is on the lower platform. Take the Clearing the Chamber quest; this spawns three patrols of Grasping Darknesses. 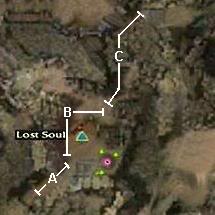 Fig. 4 – Grasping Darkness spawns, after taking quest Pick off the groups one by one, starting with A and proceeding clockwise. Make sure to drag group A down to the lower platform so as to avoid aggro'ing group B. 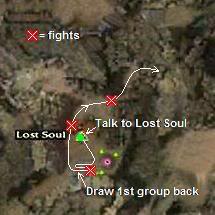 Fig. 5 – Path through initial chamber, after taking quest When all Darknesses are dead, the doors around the chamber that have been locked against you will suddenly open. You want to exit through the lower, eastern door. There will be two groups of Bladed Aatxes (groups A and C) and one group of Grasping Darknesses (group B) in the next area. 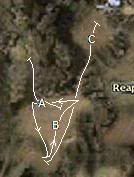 Fig. 6 – Spawns in second chamber You will generally have to kill the two groups of patrolling Aatxes, but can often avoid the Darknesses. Wait at the door until group A approaches, then aggro and pull them back through the door to fight them. Next, watch group B as it patrols in a triangle. You can slip behind them as they move away from the door. Make your way to the left, hugging the wall and watching the patrols as you go. This will lead shortly to another passage to the left; take it. Fight group C in the small clearing you find there (near the base of the stairs).  Fig. 7 – Path through second chamber Incidentally, it's quite common for these groups to become entangled and stuck at the far waypoint. You should be able to pick through whatever is left easily in this case, but make sure you keep an eye on the conglomeration while aggro'ing in case one or several creatures peel off to attack you. Once you've made your way to this point, you are basically home-free to our farming ground, the Ice Wastes. Head up the nearby stairs and through the tunnel to get there. You will encounter one group of Smite Crawlers in the tunnel (don't forget to change to your weapon/shield combo). You can either fight these here or try to drag them into the next group of Crawlers, which should spawn just outside the tunnel or somewhat to the right and downhill from there. In either case, avoid the group of Coldfire Nights circling in this region.  Fig. 8 – Spawns in the Ice Wastes, first half Coldfire patrols are indicated on the map with solid lines and potential Smite Crawler spawns are shown with X's. 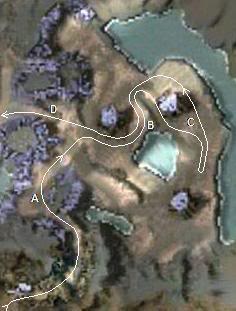 Fig. 9 – Path through the Ice Wastes, second half The rest of the run is fairly spawn-dependent, but basically you want to make your way from safe point to safe point (the letter-designated locations on the map) while avoiding Coldfire patrols and aggro'ing Smite Crawlers. The Coldfires always spawn in the same locations, but the location of the Crawlers will vary. 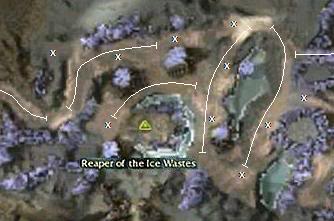 Fig. 10 – Spawns in the Ice Wastes, second half 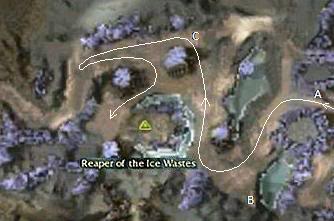 Fig. 11 – Path through the Ice Wastes, second half Also, it's very important to note that there will be two Dying Nightmares in the Ice Wastes: one in the first half, and one in the second. They generally spawn in a central location, although the second one in particular can occur over a wide range. Be sure to pull out your staff while proceeding through these areas. Notes and Concerns: An entire run will take somewhere between 65 and 80 minutes depending on the spawns, your luck in battle, and how many chances you are willing to take. On average, you will get one ectoplasm per run (although getting none is not uncommon) along with perhaps 2k-4k worth of drops. You will usually pass at least one chest in the Ice Wastes, but, in my experience, you can only expect to make enough money on chest drops to pay for the keys themselves. All in all, you can expect to net something like 6k-10k per hour in today's economy (September 2006). Since there are much simpler farming areas with comparable profit potential, this build is mostly intended for those seeking the challenge of soloing in the Underworld. Credit and Thanks: Due credit should be given to those responsible for the Underworld FAQ, the Underworld map, and the various Underworld solo and duo builds. There's no way I could have put this together without drawing on the collective knowledge, experience, and documentation provided by the community. Thanks. On a personal note, I'd also like to thank Shawna Swordslayer and Chrymdyn Rodain for their help in stomping around the Underworld with me. EDIT: Added videos Last edited by Nechtan Thaumaturge; Sep 25, 2006 at 11:36 PM // 23:36.. |

|

|
 Sep 05, 2006, 04:15 AM // 04:15
|
#2 |
|
Banned
Join Date: Jul 2006
Guild: Beep Beep Im A Jeep
Profession: R/Me
|
Very nice.
Glad to see people are still creative 
|

|

|
 Sep 05, 2006, 04:43 AM // 04:43
|
#3 |
|
(屮ಠ益ಠ)屮
Join Date: Aug 2005
Location: Hong Kong
Guild: Guildless
Profession: Mo/
|
Very nice. Congratulations.
|

|

|
 Sep 05, 2006, 06:58 AM // 06:58
|
#4 |
|
Desert Nomad
Join Date: Jan 2006
Location: The Netherlands - Hattem
Guild: [RR]
|
well done, I don't suppose u could exchange one skill for an interrupt or nuke right? because then u could just kill the dying nightmare with say, obsid flame or stone daggers..
|

|

|
 Sep 05, 2006, 07:04 AM // 07:04
|
#5 |
|
Banned
Join Date: Dec 2005
Location: Belgium
Guild: [ROSE]
Profession: A/
|
Bravo. Will try this one day. ( when I have cash )
I would like to bring a stance, so i can use my -2 ench -2 stance shield..probably resolve or physical resistance. +totem axe Last edited by Yanman.be; Sep 05, 2006 at 07:12 AM // 07:12.. |

|

|
 Sep 05, 2006, 07:43 AM // 07:43
|
#6 |
|
ǝuoʞoɯ
Join Date: May 2006
|
very nice guide ;o good job ^^;
|

|

|
 Sep 05, 2006, 09:52 AM // 09:52
|
#7 |
|
Ascalonian Squire
Join Date: Aug 2006
Location: UK
Guild: Beautiful Oblivion [EON]
Profession: E/Mo
|
This is nice... I'd been thinking about a Sliver Armor based farm build, and was using glyph of renewal to keep /that/ up all the time... didn't think about using GoR for Magnetic Aura...
As for Dying Nightmares, how about power spike or leech signet for an interrupt? Leech is a signet, so no energy cost. In act it will return you about 5 energy at Inspir rank 3. It does have a long recharge time though. Not sure what to drop in it's place though... empathy? Probably wouldn't have the firepower to take enemies out quick enough... Seems like this build is pretty slow... Be nice to take my favourite ele down there for a few attempts though 
|

|

|
 Sep 05, 2006, 03:05 PM // 15:05
|
#8 |
|
Banned
Join Date: Dec 2005
Location: Belgium
Guild: [ROSE]
Profession: A/
|
I put dom magic down 1 notch and went with a 3 energy spirit of failure. Coz you never know.
It's possible this build, but I just don't like dying nightmares. ALso, when aatxes get lucky and get sever + gash through..Man that stinks! *edit* got my first glob of ectoplasm...FTW Last edited by Yanman.be; Sep 06, 2006 at 09:17 AM // 09:17.. |

|

|
 Sep 06, 2006, 09:40 PM // 21:40
|
#9 |
|
Frost Gate Guardian
Join Date: Jul 2006
Profession: E/
|
First, thanks everyone for the interest and the comments. I tried out some of the suggestions and found that they definitely add to the build.
As far as the attributes go, you can tweak them a fair amount. Going to 14 Earth Magic doesn't hurt much (12 would be about the minimum, but I can't recommend going that low). Domination can come down to maybe 9; it's just a question of how quickly you would like to kill the Aatxes, primarily. Upping Inspiration can be fairly rewarding fairly quickly. Setting it to 6 gives you 3 energy on a miss via Spirit of Failure which should keep your energy reserves stoked nicely. I would keep Energy Storage at 9 or higher, mainly for Aura of Restoration. As far as skills go, here's what I found: -Armor of Earth, +Physical Resistance = I haven't tried this one, but it seems like a one for one trade when you factor in the -2 damage (while enchanted), -2 damage (while in a stance) shield -- incidentally, do these still drop? Obviously, you don't want to use Physical Resistance against the Coldfire Nights, but all you really need is Kinetic Armor anyway. I can't say if the Smite Crawler's Zealot's Fire will give you problems or not, though. -Armor of Earth, +Power Spike = Here you trade some armor for an interrupt. You're generally safe from the Dying Nightmares, but you're definitely on the defensive against the Aatxes. I managed to squeak through 4 Aatxe battles with this setup by pretty much casting constantly. I never got Gashed though, which would pretty much be game over, I expect. -Spirit of Failure, +Power Drain = This also gives you an interrupt to use against the Nightmares, but you give up some energy. Fortunately, 4 bars of energy regeneration alone seems like it will get you through most battles. Broadly speaking, you gain something against Dying Nightmares, Smite Crawlers, and Coldfire Nights, but lose a bit against the Bladed Aatxes and Grasping Darknesses. I did a full run using this setup, so I can vouch for it, just be sure to bring your Inspiration Magic up to 7 or so. That should more or less cover it. Good luck and happy farming! |

|

|
 Sep 06, 2006, 10:59 PM // 22:59
|
#10 |
|
Wilds Pathfinder
Join Date: Dec 2005
Guild: Leather Rebels, (LR)
Profession: W/
|
pretty cool! thumps up for creativity!

|

|

|
 Sep 07, 2006, 01:07 AM // 01:07
|
#11 |
|
Ascalonian Squire
Join Date: Jul 2006
Profession: E/
|
its a nice Build! Congraz!!
*thumbs up* Now my Idea: I think u could change "Spirit of Failure" with "Channeling" this will i dunno if its better than "Spirit of Failure" but i think ill test it soon! Im still fearing these *censored* Nightmares.. we should really use an interrupt skill..if u use an interrupt skill&Channeling i think this should happens:the Nightmare will cast Rend enchantments, if u interrrupt this the Nightmare will cast BiP and sacrifie himself to death!But i donnu if this is works and we got enough energy and so on.... and i donnu what i should take out for an interrupt *thinkin* sry 4 my (probably)bad english gr33tz N e x x u s (u can reach me ingame with this nick) |

|

|
 Sep 07, 2006, 02:47 AM // 02:47
|
#12 |
|
Academy Page
Join Date: Aug 2005
Guild: TLH
Profession: E/N
|
Great build, although I need some more practice with it, heh. Have you thought about losing Empathy as well as your points in Domination for Stone Daggers and a +4 SoF with 10 Inspiration? I know Aatxes take reduced damage, but hear me out. At level 15 Earth Magic, Sliver Armor is supposed to deal 35 damage, but to an Aatxe, it deals 16 damage. That means Stone Daggers' two hits should add up to 24 on one. Now, you spend more energy, but that shouldn't be too much of a problem if you have two SoFs up. It also helps you kill Dying Nightmares, bait out interruptions without having to wait for recharge times, keep Kinetic Armor from "getting too close" to ending, and get minor healing from AoR if the Aatxe manages to get Sever in. I'll try it out if we manage to get Favor for once.
|

|

|
 Sep 07, 2006, 10:43 PM // 22:43
|
#13 | |
|
Frost Gate Guardian
Join Date: Jul 2006
Profession: E/
|
Quote:
 I tried it out today, swapping Empathy for Stone Daggers and setting my attributes to 16 Earth, 10 Inspiration, and 9 Energy Storage. It works very nicely. Stone Daggers wipes up the Dying Nightmares, as expected, but it also helps to spike down Smite Crawlers (the last two annoying ones) and Coldfire Nights as well. It isn't as effective as Empathy against the Aatxes, mostly because they can attack faster than you can cast, but also because you can deal damage with Empathy while you are, say, casting Spirit of Failure or attacking. Aatxe battles take about a minute longer, more or less (incidentally, performance against the Grasping Darknesses is comparable). Over an entire run, my gut feeling is that you will need an extra five or ten minutes with this build. However, I think that there might be additional ways to speed things up. Energy turns out not to be a problem, even with only one Spirit of Failure in place. With two, you'll have a hard time casting fast enough to keep your energy at anything less than 90%. With that much energy, you can heal like nobody's business via Aura of Restoration. You can laugh off Sever Artery and Gash and probably tank 5-6 Aatxes with minimal drama. Interrupts most often hit the Stone Daggers, which amounts to a wasted Savage Slash/Distracting Blow. Also, you're running three attributes instead of four, which is nice, and you can dump the staff and just run your weapon/shield set. All in all, I would definitely recommend Heelz's version of the build, especially if you are just starting out in the Underworld. It is just so much more forgiving and easier to play. |
|

|

|
 Sep 08, 2006, 12:59 AM // 00:59
|
#14 |
|
Banned
Join Date: Mar 2006
Location: England
Guild: Lievs Death Squad [LDS]
|
Interesting build.
Wouldn't it be quicker to simply run past the Bladed Aatxe (dealing with the Grasping Darkness in the same way the Ritualist does) and head straight to the smites? That is if it takes a lengtly amount of time to kill the Aatxe and can often be hazardous with tricky nightmare spawns. |

|

|
 Sep 08, 2006, 06:48 AM // 06:48
|
#15 |
|
Banned
Join Date: Dec 2005
Location: Belgium
Guild: [ROSE]
Profession: A/
|
I don't think you can access the smites before you do the quest?
|

|

|
 Sep 08, 2006, 10:03 AM // 10:03
|
#16 |
|
Ascalonian Squire
Join Date: Aug 2006
Location: UK
Guild: Beautiful Oblivion [EON]
Profession: E/Mo
|
Wow... OK I tried this with the -empathy +stone daggers variation... it's hard work.
I'm very inexperienced in the UW, so I'm sure thats a big part of my problem, but I found it hard not to get interrupted on magnetic aura or something else vital... One time I forgot to put SoF up, and ran out of energy to renew stuff, so died... I just got some practice in on the trolls, but they're so much less of a threat it doesn't really compare. I'm not going to give up though... maybe I'll take a partner to res me.... Another way to tell if you have SoF up is to look for a small purple crystal circling the monsters that are hexed with it. |

|

|
 Sep 08, 2006, 02:13 PM // 14:13
|
#17 | |
|
ǝuoʞoɯ
Join Date: May 2006
|
Quote:
as Evilsod pointed out, Ritualist smites farmer use the same way to evade the aatxes as they are deadly. ;o |
|

|

|
 Sep 08, 2006, 05:25 PM // 17:25
|
#18 |
|
Banned
Join Date: Dec 2005
Location: Belgium
Guild: [ROSE]
Profession: A/
|
I see...Still don't understand what you mean though

|

|

|
 Sep 08, 2006, 09:49 PM // 21:49
|
#19 |
|
Wilds Pathfinder
Join Date: Nov 2005
Location: Baltimore, Maryland
|
whats average run time?
|

|

|
 Sep 08, 2006, 09:57 PM // 21:57
|
#20 | |
|
Banned
Join Date: Dec 2005
Location: Belgium
Guild: [ROSE]
Profession: A/
|
Quote:
|
|

|

|
 |
|
«
Previous Thread
|
Next Thread
»
| Thread Tools | |
| Display Modes | |
|
|
All times are GMT. The time now is 01:54 AM // 01:54.


 Linear Mode


